

A Complete Beginner’s Guide
Learn how to press rhinestone transfers, the best heat press settings to use, and simple tips for creating long-lasting rhinestone shirts.
Rhinestone transfers are one of the easiest ways to add sparkle, texture, and premium detail to custom apparel. Whether you’re making shirts for a boutique, dance team, cheer squad, event, or your own brand, rhinestones help designs stand out instantly.
The good news is that applying rhinestone transfers is simple when you use the right temperature, pressure, and peel method. With a heat press and a few basic steps, you can create professional-looking rhinestone shirts in minutes.
In this guide, we’ll walk through exactly how to apply rhinestone transfers, what supplies you need, the recommended heat press settings, common mistakes to avoid, and tips for getting the best results.
What Are Rhinestone Transfers?
Rhinestone transfers are pre-arranged designs made with hot-fix rhinestones. The rhinestones are already placed into the design layout, so you do not have to position each stone by hand.
Once the transfer is placed on the garment, heat and pressure activate the adhesive on the back of the stones, bonding them to the fabric.
This makes rhinestone transfers a popular option for creating custom bling apparel, spirit wear, dance shirts, cheer uniforms, boutique clothing, and personalized gifts.
Shop custom rhinestone transfers to create a design that is ready to press.
Supplies Needed to Apply Rhinestone Transfers
Before pressing your rhinestone design, gather your supplies and make sure your garment is clean, flat, and ready for application.
Best Heat Press Settings for Rhinestone Transfers
Heat press settings can vary depending on the garment and transfer type, but the recommended starting point for most rhinestone transfers is:
| Setting | Recommendation |
|---|---|
| Temperature | 335°F |
| Time | 10–15 seconds |
| Pressure | Medium to firm pressure |
| Peel Type | Cold peel |
Always test first when working with a new garment type, especially on delicate fabrics, stretchy apparel, or items with seams and raised areas.
How to Apply Rhinestone Transfers in 3 Easy Steps
Follow these simple rhinestone transfer instructions for a clean, durable, professional-looking finish.
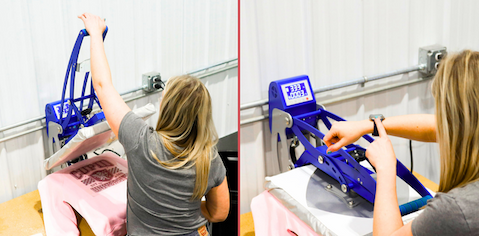
Step 1: Position the Rhinestone Transfer
Place the rhinestone transfer on the garment exactly where you want the design to appear. Make sure the design is straight, centered, and properly aligned before pressing.

Step 2: Heat Press the Rhinestone Design
Using medium to firm pressure, press the transfer at 335°F for 10–15 seconds. Apply even pressure across the full design so every stone bonds properly to the garment.
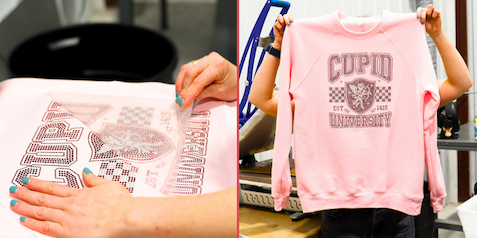
Step 3: Let Cool and Cold Peel
Allow the rhinestone transfer to cool completely to room temperature. Once cooled, slowly peel away the carrier sheet to reveal the finished design. If any stones lift, lay the carrier back down and press again.
Common Rhinestone Transfer Mistakes to Avoid
Most rhinestone application issues come from incorrect pressure, peeling too early, or pressing on uneven surfaces. Here are the most common mistakes to watch for.
Peeling While the Transfer Is Still Warm
Rhinestone transfers typically require a cold peel. If you remove the carrier sheet too early, stones may lift or shift before the adhesive fully sets.
Not Using Enough Pressure
Heat activates the adhesive, but pressure helps the stones bond to the garment. Use medium to firm pressure and make sure the entire design receives even contact.
Pressing Over Seams or Thick Areas
Seams, collars, zippers, and pockets can prevent even pressure. Use a pressing pillow when needed to raise the design area and improve contact.
Skipping the Pre-Press
Pre-pressing the garment for a few seconds can help remove moisture and wrinkles, creating a smoother surface for application.
Helpful Tips for Best Results
- If any stones shift before pressing, use tweezers to carefully reposition them.
- Use a pressing pillow when applying near seams, zippers, collars, or thick garment areas.
- Use firm, even pressure across the entire design.
- Let the transfer cool completely before peeling the carrier sheet.
- Wash finished garments inside out to help protect the rhinestone design.
- Avoid bleach and harsh wash settings for best long-term results.
Can Rhinestones Be Combined with DTF or HTV?
Yes, rhinestones can be combined with DTF transfers and heat transfer vinyl to create custom mixed-media designs.
For example, you can use rhinestones as accents around a printed logo, pair rhinestone lettering with HTV shapes, or add sparkle to boutique-style apparel.
However, avoid pressing rhinestones directly on top of DTF or HTV material. For the best adhesion, rhinestones should bond directly to the garment whenever possible.
What Types of Apparel Work Best with Rhinestone Transfers?
Rhinestone transfers can be applied to many common apparel fabrics, including cotton, polyester, and cotton/poly blends. They are often used on:
- T-shirts
- Hoodies
- Sweatshirts
- Dancewear
- Cheer apparel
- Spirit wear
- Boutique fashion items
- Event merchandise
For stretchy or delicate garments, always test first and adjust pressure as needed.
Rhinestone Transfer Care Instructions
Proper care helps rhinestone apparel last longer and keeps the stones looking bright.
- Wait at least 24 hours before washing after application.
- Turn the garment inside out before washing.
- Wash with cold water on a gentle cycle.
- Avoid bleach and harsh detergents.
- Tumble dry low or hang dry when possible.
- Do not iron directly over rhinestones.
Why Rhinestone Shirts Are Great for Custom Apparel Businesses
Rhinestone apparel has strong visual appeal and often feels more premium than a basic printed shirt. That makes it a great option for businesses that want to offer higher-value custom products.
Custom rhinestone transfers are especially popular for dance teams, cheer squads, schools, boutiques, local events, bridal parties, and spirit wear collections.
Because the transfers arrive ready to press, you can create eye-catching designs without placing stones manually or investing in complicated production equipment.
Final Thoughts
Learning how to apply rhinestone transfers is simple once you understand the basics: position the design, press with the right heat and pressure, let it cool, and cold peel the carrier sheet.
With the right technique, rhinestone transfers can create durable, professional, eye-catching apparel that customers love. Whether you’re making one shirt or launching a full custom apparel line, rhinestones are an easy way to add sparkle and value to your designs.